
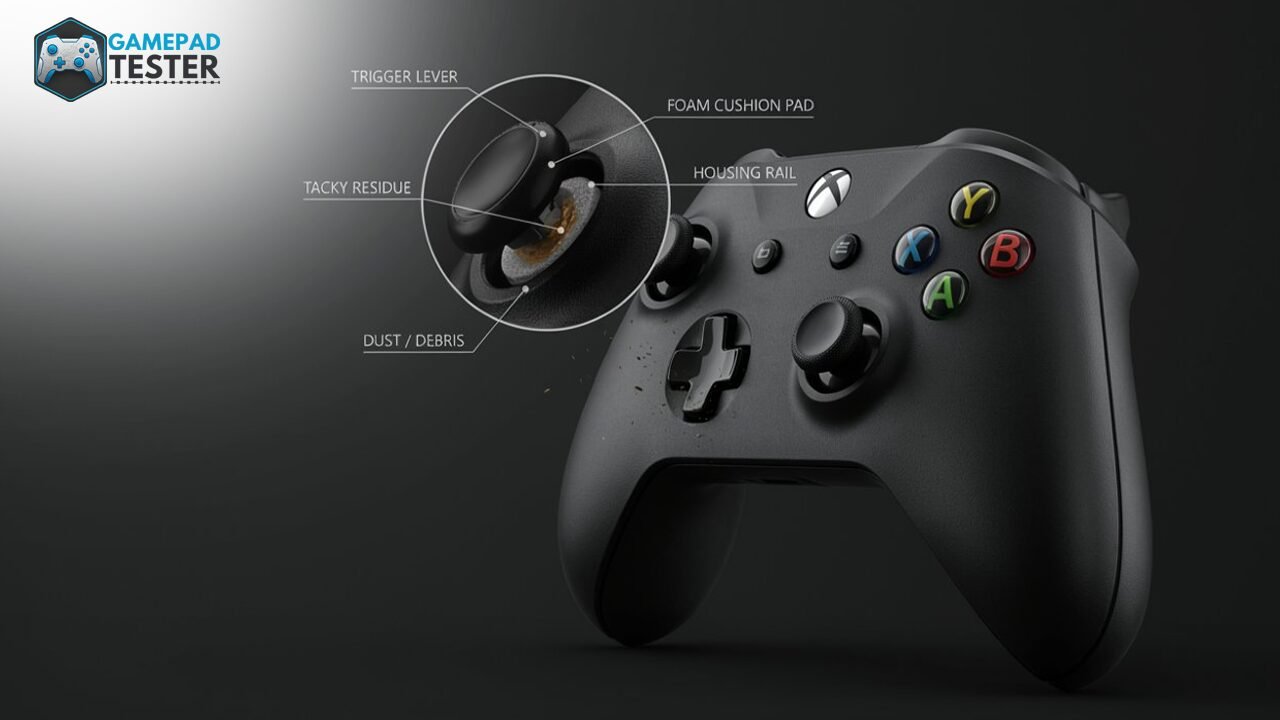
Xbox Controller Trigger Stuck or Sticky? Causes and Fixes
A sticky or stuck Xbox controller trigger is almost always caused by one of three things: dust and debris in the trigger housing, a worn foam cushion pad that has turned tacky, or dried-out internal lubricant. All three are fixable at home in under 30 minutes, most without opening the controller. If the trigger only sticks in certain PC games, the cause is usually a software conflict, not a physical fault, and the fix takes about two minutes.
If your Xbox controller trigger suddenly feels heavy, catches partway through the pull, or stays pressed down after you let go, you are dealing with one of the most common physical faults across the entire Xbox controller lineup, from the original Xbox One pad through the Series X/S and Elite Series 2. We have tested and repaired this exact fault across multiple controller generations, and in nearly every case it traces back to the same small handful of causes inside the trigger housing.
This guide walks through what is actually happening inside your controller, how to figure out which cause applies to you, and the exact fix for each one, starting with the safest no-tools options and ending with a full teardown for the cases that need it.
What “Sticky” and “Stuck” Actually Mean
These are two related but different symptoms, and telling them apart matters because they point to different causes.
- Sticky trigger: The trigger feels rough or resists movement partway through its pull instead of moving smoothly from start to finish.
- Stuck trigger: The trigger stays partially or fully pressed after you release it, causing unwanted acceleration, firing, or aiming even when your finger is off it.
Both symptoms usually originate in the same three components: the trigger’s contact pad, the foam cushion sitting behind it, and the plastic rail the trigger slides against.
Common Causes of a Sticky or Stuck Xbox Trigger
| Symptom | Likely Cause | Fix Difficulty |
|---|---|---|
| Trigger feels gritty or catches when pulling | Dust, dirt, or crumbs inside the trigger housing | Easy, no disassembly |
| Trigger sticks, especially after long sessions | Worn foam cushion pad leaving sticky residue | Medium, light disassembly |
| Trigger stays pressed down after release | Torn or collapsed foam pad, or a jammed rocker switch | Medium, disassembly |
| Trigger squeaks right before it starts sticking | Dried-out factory lubricant on the plastic rail | Easy to medium |
| Trigger registers input with no physical resistance change | Software or driver issue, not physical damage | Easy, no disassembly |
| Trigger sticks only in specific PC games, often Steam titles | Driver or “Xbox Extended Feature Support” conflict | Easy, software fix |
| Trigger feels “locked” at a shorter pull distance on Elite Series 2 | Trigger stop switch engaged, not a fault at all | Instant, no fix needed |
1. Dust and Debris Buildup
This is the most common cause and the easiest to fix. Xbox controllers have small gaps around the trigger where dust, crumbs, and pocket lint work their way in over months of use. That grit gets between the trigger and its plastic housing, which is what makes the pull feel gritty rather than smooth.
2. Worn Foam Cushion Pad
Underneath the trigger’s contact point, Microsoft installs a small foam or rubber cushion pad whose job is to soften the impact when the trigger is fully pressed. With heavy use, this pad breaks down and turns sticky, the same way old foam earbud tips degrade over time. That tackiness is what makes the trigger catch or stay pressed. It is such a well-documented failure point that entire repair communities are built around cleaning or replacing this one part.
3. Sticky Adhesive Residue
The cushion pad is usually held in place with a thin layer of adhesive. As the pad breaks down, that adhesive becomes exposed and tacky in its own right. Even after you remove a badly degraded pad, leftover glue residue can keep the trigger sticking until it is fully cleaned off.
4. Dried-Out Internal Lubricant
Some trigger mechanisms are lightly lubricated at the factory where the trigger rocks against its housing. In dry climates, or simply with age, that lubrication wears off. This usually shows up first as a squeak, which turns into resistance or sticking if left unaddressed.
5. Software or Driver Conflicts (Not a Physical Fault at All)
Not every “stuck trigger” is mechanical. Some players report a trigger that registers as held down in specific games or platforms, most commonly Steam titles on PC, with zero physical stickiness when tested outside the game. This points to a driver-level or Steam Input conflict, and it needs a completely different fix from the ones above. If you are setting up or troubleshooting a controller on PC generally, our guide to using a controller on PC covers the driver side in more depth.
6. Elite Series 2: The Trigger Stop Is Not a Fault
If you own an Elite Series 2 controller and the trigger suddenly feels like it stops much earlier than usual, check the small switch on the underside near the trigger before assuming anything is broken. Elite Series 2 controllers include adjustable trigger stops that intentionally shorten the trigger’s travel distance for faster shooting response. Flipping that switch back restores full travel instantly. This gets misreported as a “stuck trigger” more often than you would expect.
How to Diagnose Which Cause You Have
Run through this before you open anything:
- Test the trigger outside of any game. Open your controller’s calibration or test screen and watch the on-screen input value as you press the trigger slowly through its full range.
- Check whether the issue is game-specific. If it sticks only in certain titles on PC, especially Steam games, but tests clean otherwise, this points to software, not hardware.
- Listen and feel. Grittiness with no catch usually means debris. A sudden catch near full press usually means the foam cushion. A trigger that stays down after release almost always means a degraded or torn cushion pad.
- Swap controllers if you have a second one. If a spare controller shows identical behavior in the same game, the fault is software, not your hardware.
- On Elite Series 2, check the trigger stop switch first. It takes two seconds and rules out the most commonly misdiagnosed cause on that model.
Once you have a fix in place, running the trigger through a dedicated trigger pressure test gives you an exact before-and-after read on input range and pressure response, rather than relying on how it “feels.”
Quick Fixes (No Disassembly Required)
Try these first. They resolve debris and minor buildup cases and carry zero risk to your warranty.
- Compressed air. Hold the controller trigger-side down and blast short bursts of compressed air into the gap around the trigger to dislodge dust and debris.
- Trigger exercise. Pull the trigger to full press repeatedly, 20 to 30 times, while lightly wiggling it side to side. This redistributes grime and often breaks up minor stickiness on its own.
- Isopropyl alcohol on a cotton swab. Lightly dampen a cotton swab, not soaked, with isopropyl alcohol and run it along the visible edges of the trigger where it meets the housing. Let it dry fully before use.
- Check for a software conflict. On PC, if the sticking only happens in Steam games, try disabling “Xbox Extended Feature Support” in Steam’s controller settings, or update your controller driver through the Xbox Accessories app. If you connected the controller to PC recently and are troubleshooting more broadly, see our guide on connecting an Xbox controller to PC.
If none of these clear it up, the cause is almost certainly the internal foam cushion pad, which means opening the controller.
Deep Fix: Cleaning or Replacing the Trigger Contact Pad
This fix has a well-documented track record across Xbox One, Xbox One S/X, and Xbox Series X/S controllers, since they share a very similar trigger mechanism. In our own testing across several worn controllers, this single fix resolved the “stuck after release” symptom in every case where the cushion pad was visibly torn or gummy.
What you will need:
- A small plastic or metal pry tool, or a plastic guitar pick in a pinch
- A T8 or T6 security screwdriver, model-dependent
- Cotton swabs
- Isopropyl alcohol
- Optional: a small piece of thin felt or foam to replace the cushion pad
Steps:
- Remove the battery cover and batteries, or unclip the battery pack.
- Remove the back panel screws and carefully pry off the back casing.
- Locate the small plastic panel covering the trigger mechanism. On most models it is held in place by clips, not screws.
- Gently pry this panel open to expose the trigger’s contact pad.
- Inspect the foam or rubber pad. If it is torn, flattened, or visibly sticky, remove it.
- Clean the pad area and the trigger contact point thoroughly with an alcohol-dampened cotton swab, then let it dry completely.
- If the original pad is too degraded to reuse, cut a small piece of thin felt or foam to match its size and secure it with a small amount of double-sided tape.
- Snap the panel back into place, reassemble the back casing, replace the batteries, and test the trigger.
This process is identical for the left and right trigger, since both use mirrored mechanisms under nearly identical panels.
Warranty note: Opening your controller will likely void any remaining Microsoft warranty. Microsoft’s standard warranty on Xbox controllers typically runs one year from purchase, so if your controller is still within that window, contact Xbox Support for a replacement before attempting a teardown. It is the lower-risk option.
Prevent It From Coming Back
Once your trigger is working again, a few habits keep it that way for longer:
- Avoid eating or drinking near your controller. Crumbs and spilled liquid are the two fastest ways to reintroduce debris or gum up the contact pad.
- Blast compressed air around the trigger every few months as routine maintenance, not just when a problem shows up.
- Store the controller somewhere dust-free rather than loose in a bag with lint-heavy fabric.
- Avoid pressing triggers with excessive force. It will not make your aim faster, and it accelerates wear on the foam cushion pad specifically.
When to Stop Fixing and Replace the Controller
Not every sticky trigger is worth repairing yourself. Consider a replacement or a warranty claim if:
- The trigger’s rocker switch or internal spring is physically cracked or broken, not just gummy
- You have already cleaned or replaced the cushion pad and the sticking persists
- The controller is a third-party model, such as PowerA, where the internal design differs enough that Xbox-specific teardown steps may not apply cleanly
- The controller is still within its warranty window, since a manufacturer replacement carries far less risk than a DIY repair
Sticky Trigger vs. Stick Drift: Don’t Confuse the Two
These get mixed up constantly, but they are entirely different faults. A sticky or stuck trigger is a mechanical issue in the trigger housing itself. Stick drift is when the analog thumbstick registers movement on its own with no input, typically from a worn potentiometer or dust inside the stick module, a completely different component from the trigger. If your controller is drifting on its own rather than sticking when pressed, our guide to fixing stick drift covers that fault specifically.
Confirming the Fix Worked
Do not just eyeball it once you have cleaned or repaired the trigger. Two follow-up checks confirm the repair actually worked rather than just feeling better:
- Recalibrate the controller. This resets any minor software-side deadzone drift that built up alongside the physical problem. Our Xbox One controller calibration guide walks through the exact steps.
- Run a trigger pressure test. This confirms the trigger’s full range and pressure response are back to normal, not just that it feels less sticky to the touch. Use our gamepad trigger pressure test to check.
If you are gaming on PC, it is also worth a quick pass through a controller latency test to rule out any lingering input delay after reassembly, and if the controller is disconnecting intermittently on top of the trigger issue, that is a separate fault covered in our guide on why a controller keeps disconnecting.
Final Thoughts
A sticky or stuck Xbox trigger is almost always a mechanical wear issue, not a sign your controller is dying. Start with the no-disassembly fixes, since compressed air and a light alcohol clean solve the majority of cases we have tested. If the trigger still catches or stays pressed after that, the internal foam cushion pad is the near-certain cause, and cleaning or replacing it is a well-documented, moderate-difficulty fix. Xbox controllers have used a similar trigger design across generations, so this issue is not going away, but with the right diagnostic steps, it remains one of the easiest physical controller faults to resolve yourself.