What Is Controller Deadzone? (And How to Change It on PS5, Xbox, PC, and Switch)
Controller deadzone is the small zone of stick movement near the center that a game ignores before it counts as real input. It exists to filter out the faint electrical noise every analog stick produces at rest, even when your thumb isn’t touching it. Set too small, it lets that noise through and looks like drift. Set too large, it makes small aiming adjustments feel delayed or unresponsive.
Move your analog stick a tiny bit and nothing happens on screen. Move it a little more and your character suddenly sprints off in a direction you didn’t mean to go. That gap between “nothing” and “too much” is your controller’s deadzone, and it’s one of the most misunderstood settings in gaming. Most players only discover it exists after their aim starts feeling sluggish or their character drifts on its own, and by then they’re not sure whether the problem is a setting or a broken stick.
This guide explains what a deadzone actually is, why every controller needs one, how to tell if yours is set wrong, and how to change it on PS5, Xbox, PC, and Switch. It also covers how deadzone relates to stick drift, since the two get confused constantly and fixing one doesn’t fix the other.
What Is Controller Deadzone?
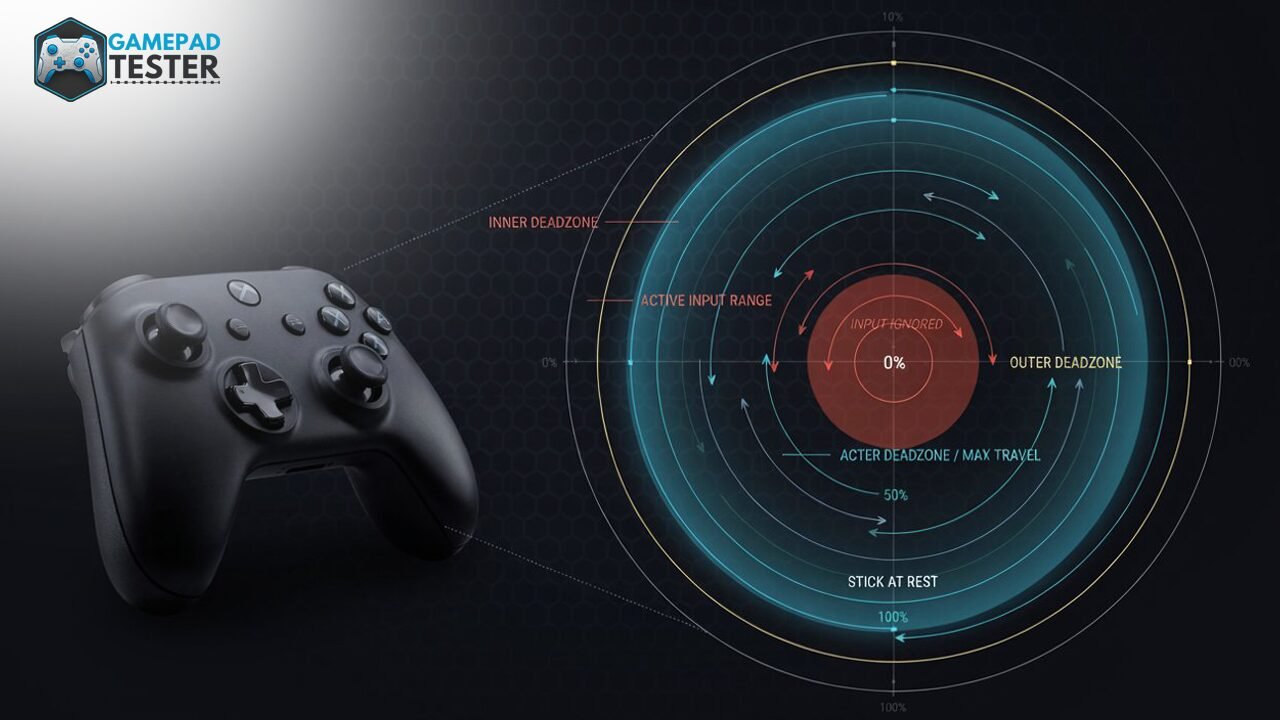
A controller deadzone is the distance an analog stick has to travel from its resting center before the game or system starts counting it as an actual input. Push the stick and nothing happens for the first few millimeters of movement. That gap is the deadzone doing its job.
Every analog stick reports a constant stream of position data, even when you’re not touching it. At rest, that data should read as a flat zero, but in practice it almost never does. Tiny electrical noise, manufacturing tolerances, and normal wear all cause the stick to report a faint, fluctuating signal even when your thumb is completely off it. Without a deadzone, that noise would translate into constant, unwanted micro-movement in-game. The deadzone tells the system to ignore any signal inside that small radius and treat it as zero.
You can check exactly how much noise your own stick produces, and where your current deadzone effectively sits, using our joystick deadzone test tool. Rest the controller on a flat surface, don’t touch the sticks, and watch the live reading. That number is your personal starting point for everything below, and it’s the single most reliable way to set a deadzone correctly, because it’s based on your actual hardware instead of a number copied from a forum post.
Inner Deadzone vs. Outer Deadzone
Most people only think about one deadzone, but sticks actually have two, and they do opposite jobs.
| Inner Deadzone | Outer Deadzone | |
|---|---|---|
| Location | Around the stick’s resting center | Near the physical edge of stick travel |
| What it controls | The threshold before any input registers at all | The point where input is read as 100% (max) deflection |
| Raise it to… | Hide resting noise or mild drift | Reach full-speed movement before physically maxing the stick |
| Lower it to… | Register smaller, more precise movements near center | Require the stick to travel closer to its true physical limit before hitting max input |
| Common problem it masks | Stick drift, sensor noise | Worn sticks that can no longer reach their original physical corners |
When someone says “my deadzone is too big,” they almost always mean the inner deadzone. That’s the one worth adjusting first.
There’s also a less common third option in some PC tools called anti-deadzone, which does the opposite of a normal deadzone. It pushes a small amount of output past a game’s built-in deadzone so that tiny stick corrections still register. This is mainly useful in older games with unusually large, hard-coded deadzones that can’t otherwise be reduced.
Deadzone Shape: Radial vs. Axial
This is a detail most guides skip entirely, but it changes how your stick actually feels in the corners of its range.
- Radial (circular) deadzone treats the ignored zone as a circle around the center. Any input inside that circular radius, in any direction, gets ignored equally. This is the most common shape and the one most console games use.
- Axial (square) deadzone applies the deadzone separately to the X-axis and Y-axis. This can leave small diagonal inputs registering even when a straight up, down, left, or right input wouldn’t, because the diagonal distance from center is technically larger than either axis alone.
Most players never notice this distinction because most games only expose one deadzone value and calculate the shape internally. But if you’re using Steam Input or a similar PC tool and your diagonal movement feels different from your cardinal-direction movement at the same stick displacement, the deadzone shape setting, not the deadzone size, is usually the reason.
Response Curves: The Setting That Works Alongside Deadzone
Deadzone controls when input starts. A response curve (sometimes called sensitivity curve or acceleration curve) controls how that input scales after it starts. A linear curve means stick displacement and in-game movement scale at the same rate. A more aggressive curve keeps early stick movement slow and precise, then ramps up sharply as you push further out, which is common in aim-focused competitive setups.
The two settings solve different problems. A deadzone that’s too large won’t be fixed by a different response curve, and a response curve that feels wrong won’t be fixed by changing your deadzone. If your aim still feels off after correctly setting your deadzone using a noise reading from the tester tool, the response curve is the next setting worth checking, not a further deadzone increase.
Signs Your Deadzone Is Set Wrong
- Your character keeps walking or the camera keeps drifting even when you’re not touching the stick. This points to a deadzone that’s too small, or to drift the deadzone can no longer hide.
- Small aiming adjustments don’t register until you’ve already overcorrected. This points to a deadzone that’s too large.
- You have to push the stick noticeably far before the game responds at all. This points to an inner deadzone that’s too large.
- You never seem to hit full sprint or full turn speed even at max stick travel. This points to an outer deadzone that’s too large, which is common on worn sticks.
If you’re seeing the first symptom and increasing the deadzone doesn’t help, or you’d need an unreasonably large deadzone to stop it, that’s a sign of hardware stick drift rather than a settings issue. Our guide on fixing stick drift covers how to diagnose and actually repair that, since a deadzone adjustment only ever hides drift temporarily. It buys you time. It doesn’t repair the worn component causing it.
How to Change Controller Deadzone on PS5
Sony doesn’t offer a system-wide deadzone setting on PS5. There’s no menu under Settings that lets you set one global value for every game. Instead, deadzone adjustment lives inside individual games that choose to expose it.
Steps:
- Launch the game you want to adjust.
- Open its in-game Settings or Options menu.
- Look for a Controller, Controls, or Advanced Controls submenu.
- Find “Deadzone,” “Stick Deadzone,” or occasionally “Stick Sensitivity.”
- Lower it in small steps, testing after each change, until you find the point right before drift or unwanted movement reappears.
Not every game exposes this. Competitive shooters and racing games are the most likely to include it. Older or smaller titles often don’t. Some games, particularly with a DualSense Edge, allow independent left-stick and right-stick deadzone values through the controller’s own hardware profile buttons, not just the game menu.
If your DualSense is showing drift symptoms rather than a simple “feels off” issue, run it through our guide on recalibrating a PS5 controller first. A miscalibrated center point can look exactly like a deadzone problem, and no amount of deadzone tweaking fixes a bad calibration. For official Sony guidance on controller settings, see PlayStation Support.
How to Change Controller Deadzone on Xbox
Xbox has a real advantage here. Microsoft’s free Xbox Accessories app gives you direct, numeric deadzone control that isn’t limited to games that build it into their own menus.
Steps:
- Install the Xbox Accessories app from the Microsoft Store (Windows 10/11, or directly on Xbox consoles).
- Connect your controller and select it in the app.
- Go to Configure, then Stick Configuration.
- Adjust the inner and outer deadzone sliders independently for each stick.
- Save the profile.
On Xbox Elite Series 2 and newer Series X|S controllers, this profile saves directly to the controller’s internal memory. That means your custom deadzone follows the controller even when you unplug it and use it on a different device.
Many individual Xbox games also expose their own in-game deadzone slider, which can stack with or override your Accessories app profile depending on the title. It’s worth checking both if something still feels off after a system-level change. If you’re setting this up on a controller you just connected to a PC or console for the first time, our guides on connecting an Xbox gamepad to PC and calibrating an Xbox One controller cover the setup steps that should come before deadzone tuning. Microsoft’s official documentation is available through Xbox Support.
How to Change Controller Deadzone on PC (Steam Input, DS4Windows)
PC gives you the most granular control, but it also has a hidden trap. Windows’ standard XInput driver layer applies its own processing on top of your controller’s raw signal, which can inflate the effective deadzone you feel in-game well beyond what your controller actually produces. If you’ve only ever used a controller through raw XInput without a dedicated input tool, part of what feels like “my deadzone is too big” may be that extra software layer rather than your hardware.
Using Steam Input (works for both Xbox and PlayStation controllers, including non-Steam games added to your library):
- Right-click the game in your Steam library, then select Controller Configuration.
- Select your device, then open Additional Settings.
- Under the Left Stick and Right Stick sections, you’ll find separate inner deadzone, outer deadzone, and response curve controls.
- The scale here runs from 0 to 1, where 0.10 means the first 10% of stick travel is ignored.
Valve documents these settings in detail in its Steam Input developer and user documentation.
Using DS4Windows (for PlayStation controllers specifically): DS4Windows exposes deadzone, anti-deadzone, and maxzone settings independently, which makes it a strong option if you want a DualSense or DualShock 4 to behave more precisely on PC than its default profile allows. If you haven’t already paired the controller, see our guides on connecting a PS4 or PS5 controller to a PC and using a controller on PC first.
A safe starting formula that shows up consistently across competitive communities: measure your stick’s resting noise using a deadzone tester, then set your inner deadzone about 0.02 to 0.05 above that resting value, not a flat preset copied from someone else’s controller. Two units of the same controller model, bought on the same day, can have noticeably different resting noise, which is exactly why a live reading beats a shared preset.
How to Change Controller Deadzone on Nintendo Switch
Joy-Cons and the Switch Pro Controller don’t offer an adjustable deadzone through the console’s system settings, and very few Switch games expose one either. If a Joy-Con is drifting, Nintendo’s official recommendation is to recalibrate it through System Settings, then Controllers and Sensors, then Calibrate Control Sticks. This resets the stick’s understood center point rather than changing a deadzone value. Nintendo documents this process on its official support site.
If recalibration doesn’t resolve drifting or unresponsive input, that generally points to a hardware issue rather than something a software deadzone could mask, since the platform gives you so little room to compensate for it.
Deadzone vs. Stick Drift: What’s the Difference
These two terms get used interchangeably online, but they’re not the same thing, and confusing them leads people to “fix” the wrong one.
| Deadzone | Stick Drift | |
|---|---|---|
| What it is | A setting that controls when input starts registering | A hardware or signal problem causing false input |
| Can you adjust it? | Yes, directly, in supported games or tools | Not directly. You can only mask its effects with a larger deadzone |
| Does adjusting it fix the root cause? | Not applicable, it’s a setting, not a fault | No, it’s a wear or contact issue that keeps getting worse over time |
| Where to go for a real fix | This guide | Our stick drift guide |
If a slightly larger deadzone quiets very mild drift, that’s a legitimate short-term workaround. But once a stick needs a large deadzone just to sit still, you’re not tuning a setting anymore. You’re compensating for a part that’s wearing out.
Why Some Sticks Need a Deadzone at All: Potentiometer vs. Hall-Effect vs. TMR
Most controllers built before the last few years use potentiometer sticks, which measure position through a physical contact point sliding across a resistive surface. That contact point wears down with use, which is the underlying mechanical reason resting noise increases over time and older sticks need progressively larger deadzones.
Hall-effect sticks measure stick position magnetically instead, with no physical contact surface to wear down. TMR (tunneling magnetoresistance) sticks work on a similar magnetic principle with even finer sensitivity. Both tend to produce less resting noise and hold a smaller usable deadzone for much longer, which is why they’ve become popular in newer controllers and aftermarket replacement parts aimed at competitive players. Neither technology eliminates the need for a deadzone entirely, since some baseline sensor noise is still normal, but both reduce how large that deadzone needs to be.
The Bottom Line
Deadzone isn’t a mysterious setting to leave on default and forget. It’s a noise filter, and like any filter, the right value depends entirely on what your specific controller is actually producing at rest. Start by measuring your stick with a live deadzone test instead of copying a number from a forum post, then adjust just enough to quiet the noise without swallowing your small, precise movements.
If no amount of adjustment keeps your stick calm, that’s your signal to stop tuning software and start looking at the hardware. As more controllers move to Hall-effect and TMR sticks over the next few years, deadzone tuning will likely matter less for drift specifically, but it will stay relevant for anyone chasing faster response times in competitive play.