PS5 Controller Layout Explained: Every DualSense Button
You picked up a DualSense controller, and somewhere between the touchpad, the two triggers that don’t feel like triggers anymore, and a button labeled “Create” that didn’t exist on your old PS4 pad, you paused. What does this actually do? Which stick click is L3 and which is R3? Why does the trigger feel like it’s fighting back?
That confusion is common, and it’s not because the layout is complicated. It’s because Sony changed more than the shape of the controller when it launched the DualSense. It renamed a button, added a microphone array, built adaptive resistance into the triggers, and rearranged how a few core functions work compared to the DualShock 4. If you’re new to PS5, coming from Xbox, or just trying to figure out why a specific button isn’t doing what you expect in a game, you need a layout you can actually reference.
This guide breaks down every button, stick, and port on the DualSense, what it’s called, where it sits, and what it does both in games and in the PS5 system menu. You’ll get a direct comparison against the DualShock 4, the DualSense Edge, the Access controller, and Xbox controllers, plus a clear path to remapping buttons and fixing the most common physical issues people run into with this exact hardware.
PS5 controller layout at a glance
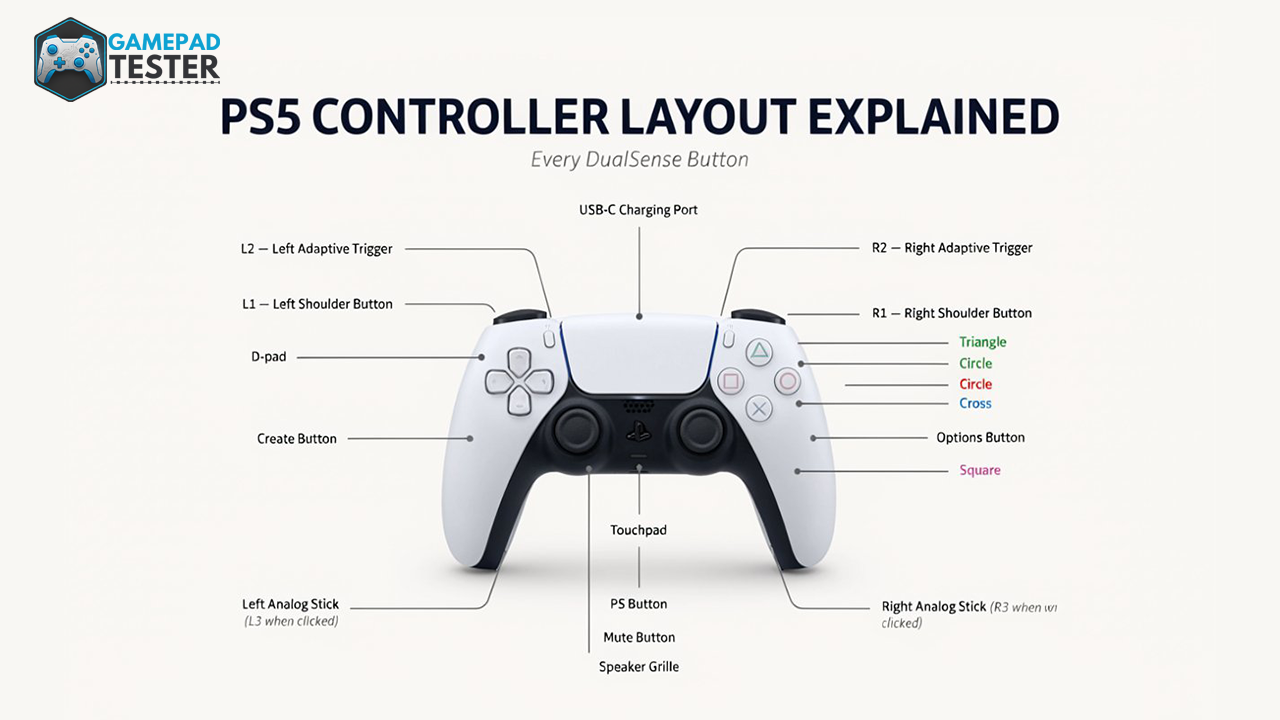
The DualSense has four face buttons (Triangle, Circle, Cross, Square), a D-pad, two clickable analog sticks (L3/R3), four shoulder inputs (L1, R1, L2, R2 adaptive triggers), a centered touchpad with a built-in click function, a Create button and Options button flanking the touchpad, a PS button, a mute button for the built-in microphone, and a USB-C port on top for charging and wired play. That’s 17 total input points once you count the stick clicks and touchpad click separately from their directional or gesture use. The controller weighs about 280 grams and ships with a USB-C to USB-A charging cable in the box, no separate charging dock included.
Front face: the action buttons
On the right side of the pad sit the four buttons every PlayStation user already knows by shape and color.
| Button | Symbol color | Common function |
|---|---|---|
| Triangle | Green | Menus, special abilities, “view info” in system UI |
| Circle | Red | Cancel or back, melee or secondary actions in games |
| Cross (X) | Blue | Confirm or select, jump or interact in most games |
| Square | Pink | Reload, inventory, or context actions |
In the PS5 system menu specifically, Cross selects a highlighted item and Circle cancels a command, while Triangle rearranges items in a list or opens related information. In-game mapping varies by title, but these four almost never move position, so once you learn them here, they carry over to every PS5 game you own.
D-pad
The D-pad sits on the left side of the face, directly across from the action buttons. It’s a single directional pad, not four separate buttons, and it’s used mainly for menu navigation, weapon or item quick-select, and directional inputs in fighting or platforming games.
Analog sticks: L3 and R3
Two parallel thumbsticks sit side by side near the center-bottom of the controller. That’s a genuine layout difference from Xbox, whose sticks are staggered rather than parallel, and it’s one reason the two pads feel different in the hand even though the button count is the same. Each stick can also be pressed straight down as a button.
- L3 (left stick click): commonly used for sprint, crouch toggle, or melee
- R3 (right stick click): commonly used for aim-down-sights, zoom, or camera reset
If your sticks feel like they drift or don’t return to center on their own, that’s a hardware or software issue separate from the layout itself. Our guide on controller deadzone explains why a stick can register movement even at rest, and our stick drift fix guide walks through calibration and repair steps.
Shoulder buttons and adaptive triggers
This is where the DualSense diverges most from every controller that came before it. Along the top edge sit four inputs, two per side.
| Button | Position | Feel | Function |
|---|---|---|---|
| L1 / R1 | Top shoulder buttons | Fixed click, no resistance | Fast-fire actions, block, ability triggers |
| L2 / R2 | Bottom triggers | Adaptive resistance, spring-loaded with variable tension | Aim, accelerate, brake, charge attacks |
L2 and R2 are the adaptive triggers the DualSense was built around. Supported games can adjust the tension you feel when pulling them, simulating things like a bowstring drawing back or a car’s brake pedal resisting under pressure. That mechanical complexity is also why L2 and R2 are the components most likely to develop stiffness or a sticking feeling with heavy use over time. In our own testing, trigger resistance that persists in the PS5 menu (where no game is applying haptic tension) is the clearest sign of a mechanical fault rather than a feature working as intended. If your triggers feel physically stuck, check our guide on testing controller latency to rule out input lag before assuming the worst, and see our separate breakdown of Xbox trigger issues if you’re comparing symptoms across platforms.
Top center: Create, Options, and PS button
Three buttons sit along the top-center area, and this is the section that trips up the most PS4-to-PS5 switchers.
- Create button (left of touchpad): replaced the DualShock 4’s Share button. Opens the Create menu for screenshots, video clips, and broadcasting, with more editing and sharing options than Share ever had.
- Options button (right of touchpad): opens the in-game pause or options menu, functionally identical to its DualShock 4 role.
- PS button (bottom center, below the touchpad): the PlayStation logo button. Opens the Control Center, wakes the console from rest mode, and long-presses to power off or bring up quick settings.
Touchpad
The large touchpad in the center of the controller serves two purposes. Games can read swipe gestures across its surface for things like map navigation or item selection, and the entire pad can also be pressed down as a physical button, which some games map to specific actions like opening an inventory or triggering a special ability.
Microphone and mute button
The DualSense has a built-in microphone array, a genuine new addition compared to the DualShock 4. A small mute button sits just below the PS button and above the touchpad’s lower edge. Tapping it mutes the built-in mic, and your headset mic if one is connected, instantly, with an LED indicator confirming the mute state.
Haptic feedback vs. rumble: what changed under the hood
It’s worth separating two things people often lump together. Rumble, the technology in the DualShock 4 and most older controllers, uses simple motors that shake the whole controller at one or two intensities. Haptic feedback, which the DualSense introduced, uses more precise actuators that can simulate distinct textures and impacts, a raindrop feels different from a gunshot, which feels different from footsteps on gravel. This is a different system from the adaptive triggers, though the two are often marketed together. If you’re troubleshooting a controller that feels numb or unresponsive in supported games, that’s a haptics issue, and our guide on controller vibration not working covers the fix.
Ports and physical connections
- USB-C port (top edge, center): charges the controller and allows wired play on PS5 or PC.
- 3.5mm headphone jack (bottom edge): for wired headsets.
- Built-in speaker: located near the touchpad, used for select in-game audio cues and notification sounds.
For checking how much charge you have left before a session, see our guide on checking PS5 controller battery level.
DualSense vs. DualShock 4: what actually changed
| Feature | DualShock 4 (PS4) | DualSense (PS5) |
|---|---|---|
| Share/Create button | Share | Create, with expanded content tools |
| Triggers | Standard L2/R2, no resistance | Adaptive L2/R2 with variable resistance |
| Feedback | Basic rumble motors | Haptic feedback, localized and textured |
| Microphone | None built in | Built-in mic array with mute button |
| Stick layout | Parallel position | Same parallel position, larger stick caps |
| Face buttons and D-pad | Standard layout and position | Same layout and position |
| Battery charging | Micro-USB | USB-C |
The face buttons, D-pad, and stick positions never changed. If you already know a DualShock 4 by feel, roughly 80% of the DualSense layout will feel immediately familiar. The differences concentrate in the top-center cluster (Create instead of Share, added mic and mute) and in the trigger mechanism itself.
DualSense vs. DualSense Edge: layout differences
The DualSense Edge is Sony’s premium, remappable controller. The core button layout is unchanged, but it adds hardware the standard DualSense doesn’t have.
- Two back paddle buttons, fully remappable
- Swappable analog stick modules and interchangeable stick caps
- Adjustable trigger stop switches for a short-pull mode on L2/R2
- A dedicated Fn (function) button pair for on-the-fly profile switching
- A profile-switch mini-button on the underside
If you’re deciding between the two, the standard DualSense covers every button described in this guide with no compromises for the vast majority of players. The Edge is a competitive and accessibility upgrade layered on top of the same base layout, not a redesign of it.
DualSense vs. Access controller: an accessibility option worth knowing
Sony also sells the PS5 Access controller, a round, modular pad designed for players with limited mobility or grip strength. It doesn’t replace the DualSense’s standard layout; it lets you remap and physically customize inputs using swappable buttons and external switch ports. If a standard DualSense layout is physically difficult to use, this is Sony’s dedicated answer, and it’s worth knowing it exists separately from the Edge, which is a performance product rather than an accessibility one.
DualSense vs. Xbox controller: button mapping
| DualSense (PS5) | Xbox controller | Function |
|---|---|---|
| Cross | A | Confirm/jump |
| Circle | B | Cancel/back |
| Square | X | Reload/context action |
| Triangle | Y | Ability/menu |
| L1 | LB | Bumper |
| R1 | RB | Bumper |
| L2 | LT | Trigger |
| R2 | RT | Trigger |
| L3 | LS (left stick click) | Sprint/crouch |
| R3 | RS (right stick click) | Aim/zoom |
| Create | View/Back | Screenshot/capture |
| Options | Menu/Start | Pause menu |
| Touchpad | No direct Xbox equivalent | Gestures/context |
If you’re playing PS5 games on a PC with a controller, or connecting an Xbox pad to a PS5 for comparison, this table maps the functional equivalents directly. For PC-specific setup, see our guides on connecting a PS4 or PS5 controller to a PC, connecting an Xbox controller to a PC, and using a controller on PC generally.
How to remap PS5 controller buttons
If the default layout doesn’t work for your hand size, playstyle, or accessibility needs, the PS5 lets you reassign what each button does system-wide.
- Open Settings from the PS5 home screen.
- Go to Accessories, then select Controllers.
- Choose Custom Button Assignments.
- Toggle Custom Button Assignments on.
- Select the button you want to remap, then choose the new action or input you want it to perform.
- Save your profile. You can create multiple profiles and switch between them without redoing the setup each time.
This system-level remap works across most games, though some titles with their own in-game rebind menus may override it. The PS and Create buttons stay system-reserved regardless of remapping, since the console relies on them for core navigation and capture. If a button stops responding correctly after remapping, or seems unresponsive in general, our guide on why your controller isn’t working is the right next step.
Common layout-related problems and fixes
Once you know where every button is, the next question is usually why a specific one isn’t working right. Here’s where to go for each symptom.
| Symptom | Likely cause | Guide |
|---|---|---|
| Stick drifts without input | Worn potentiometer or dirt in stick housing | Fix stick drift |
| Aiming feels imprecise even when still | Deadzone set too high or too low | What is controller deadzone |
| No rumble or haptic feedback | Vibration settings disabled or hardware fault | Controller vibration not working |
| Controller loses connection mid-game | Bluetooth interference or low battery | Why does my controller keep disconnecting |
| Inputs feel delayed | Wireless interference or firmware issue | How to test controller latency |
| Buttons feel unresponsive after setup | Needs calibration | How to calibrate a PS5 controller |
| Want to use it on iPhone | Bluetooth pairing steps differ from console | Connect a PS5 controller to iPhone |
Final thoughts
The DualSense didn’t reinvent the PlayStation controller from scratch. The face buttons, D-pad, and stick positions are exactly where a PS4 owner would expect them. What changed is concentrated in a few high-impact spots: the renamed Create button, the adaptive triggers, the built-in mic, and, on the Edge, fully remappable back paddles. Once those differences click, the rest of the layout is muscle memory you already have.
As Sony continues refining accessibility options and remapping tools through PS5 system updates, expect the software side of “layout” to keep getting more flexible even as the physical button positions stay fixed for the life of this generation. If something on your controller isn’t matching what’s described here, from stick drift to disconnect issues to battery drain, the troubleshooting guides linked throughout this article cover the fixes for nearly every one of those problems.